After using ThoughtSpot DataFlow to establish a connection to an IBM Db2 database, you can create automatic data updates, to seamlessly refresh your data.
To sync your data, perform these tasks:
Select table
-
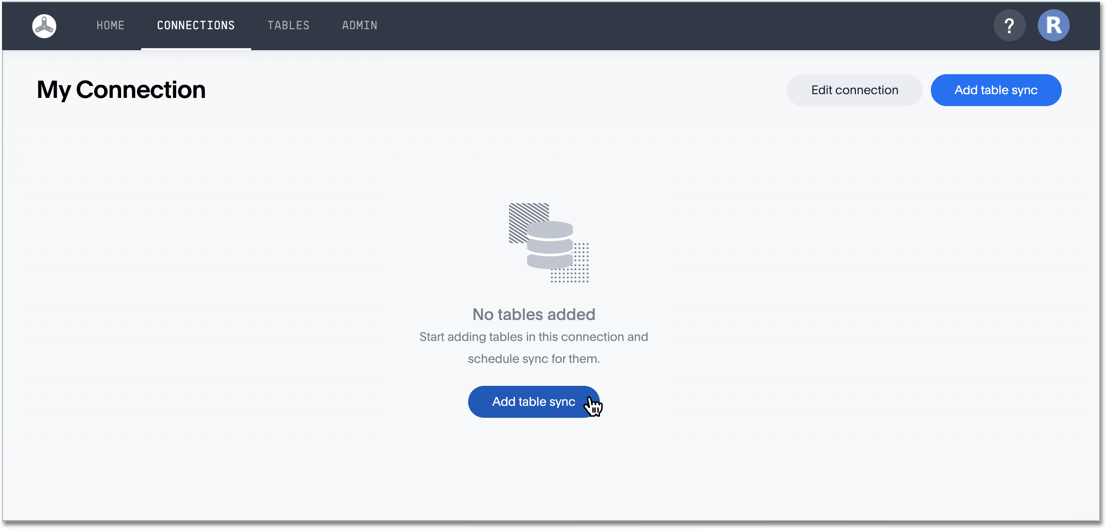
Immediately after creating a new connection, the connection detail page appears.
You can fill out this information immediately, or return to it at a later stage, by clicking on the connection name in the list of connections.
-
On the connection detail page, click Add table sync.
See how to initiate a new table sync
-
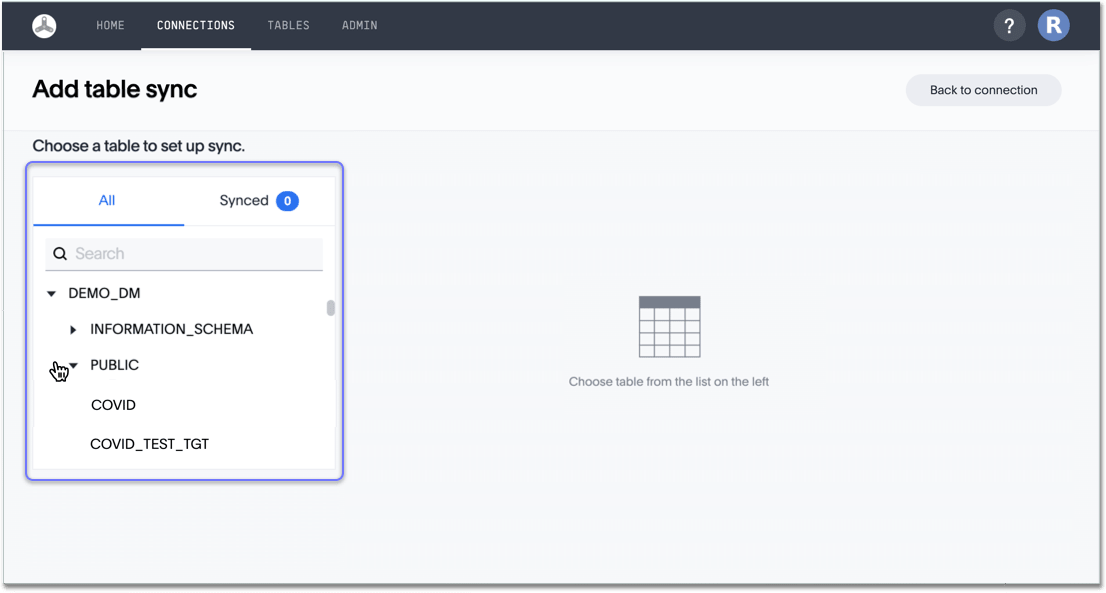
In the Add table sync interface, on the database selector, scroll to select and open the source database.
Note that you can search for the database by name.
See how to specify the source database on the connection
-
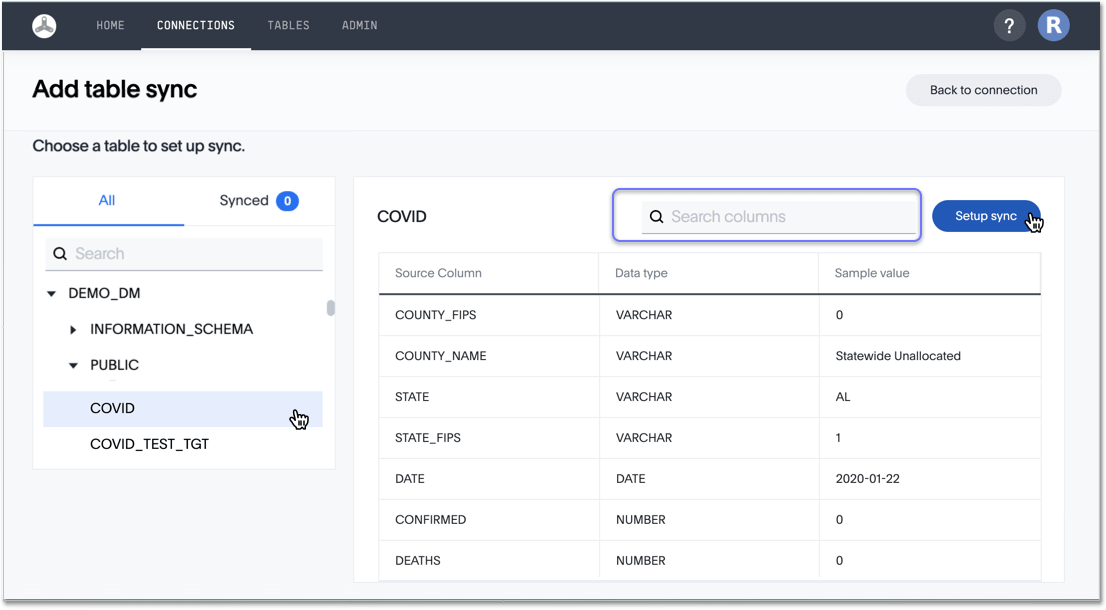
From the database, select the table you plan to sync. You can also search for the table by name.
Note that if you use multiple tables, you have to repeat these steps for each table.
Before confirming that you plan to sync a particular table, examine it to ensure that it has the right information: the correct data types, and reasonable sample data.
For large tables, use the search bar to search column names.
See how to examine the source table and its columns before sync
-
Click Setup sync.
Specify sync schedule
Immediately after creating a new connection, the connection detail page appears.
When you schedule you create a sync, you have the following scheduling options:
- Hourly
- Daily(default)
- Weekly
- Monthly
- Does not repeat
After you specify the sync schedule, click Save and sync now. This action saves the schedule, and starts the data sync immediately.
Alternatively, if you click Save, the system saves the schedule, but does not sync the data. This gives you the opportunity to fine-tune the column mapping between external data sources and tables inside ThoughtSpot, such as naming, visibility, data type conversion, conditions, and so on. The first sync starts on the specified schedule.
Hourly sync
See the elements of the Hourly scheduling screen
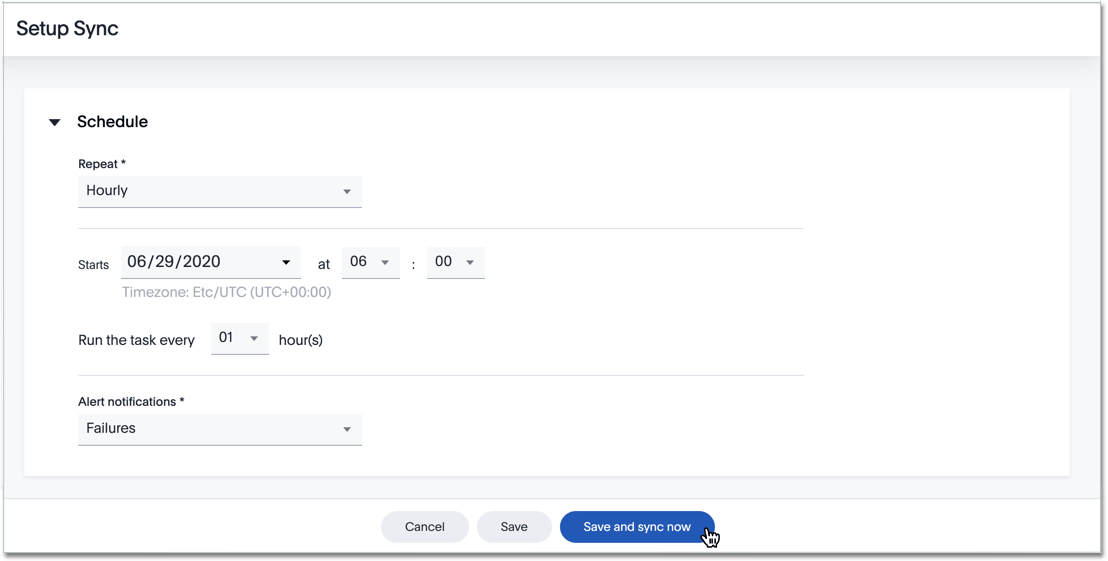
- Repeat
- Select hourly.
Mandatory field. - Starts
- Accept the defaults, or set your own starting date and time for syncing.
Note that the timezone is in UTC+00:00.
Mandatory fields. - Run the task every X hour(s)
- Select the frequency of the sync.
The valid range is from 1 (default) to 12 hours.
Mandatory field. - Alert notifications
- Specify when to notify of the sync status:
- Failures (default)
- Success and Failures
- Never
Daily sync
See the elements of the Daily scheduling screen
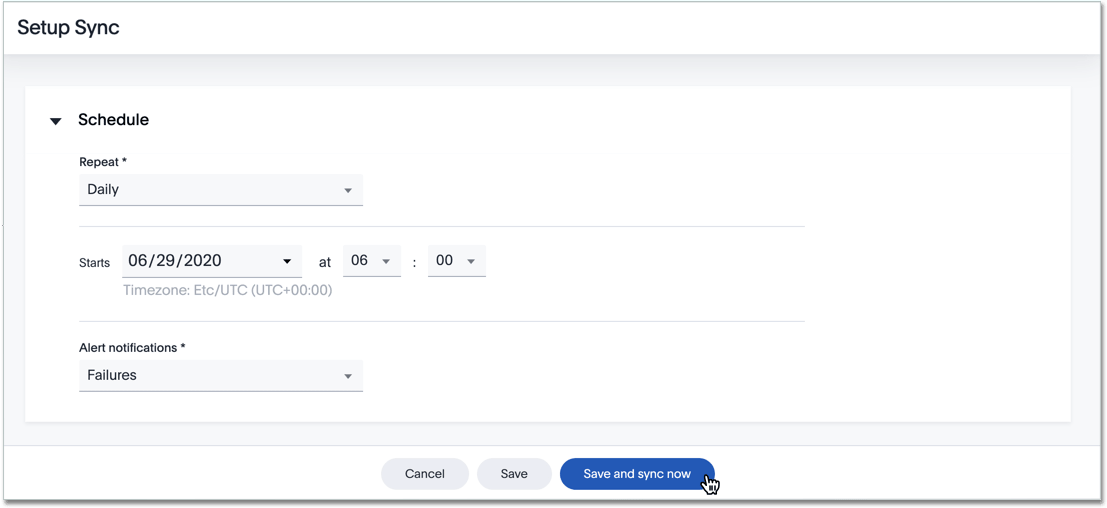
- Repeat
- Select daily.
Mandatory field. - Starts
- Accept the defaults, or set your own starting date and time for syncing.
Note that the timezone is in UTC+00:00.
Mandatory fields. - Alert notifications
- Specify when to notify of the sync status:
- Failures (default)
- Success and Failures
- Never
Weekly sync
See the elements of the Weekly scheduling screen
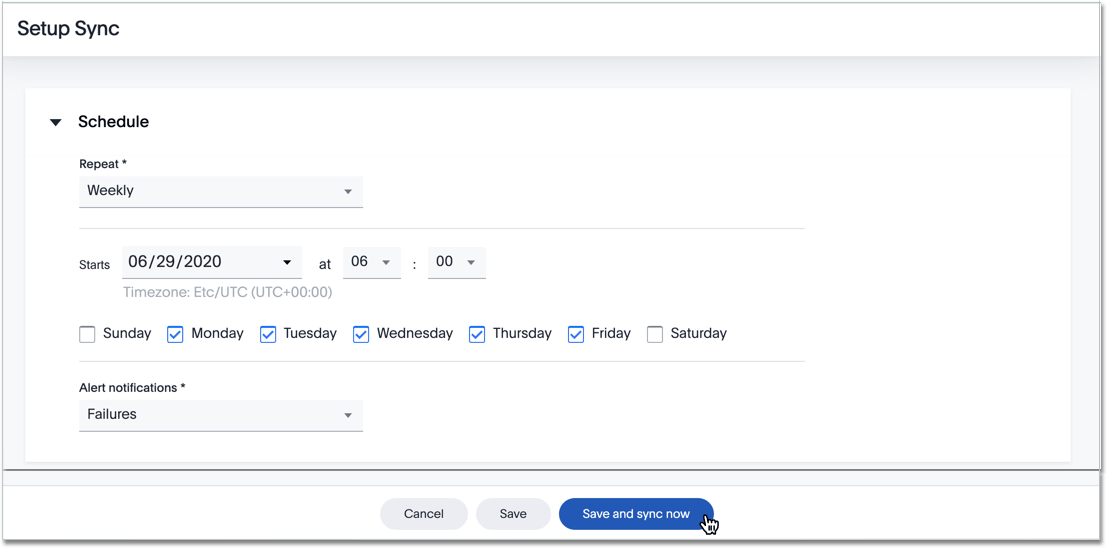
- Repeat
- Select weekly.
Mandatory field. - Starts
- Accept the defaults, or set your own starting date and time for syncing.
Note that the timezone is in UTC+00:00.
Mandatory fields. - Days of the week
- Select the days of the week when you want to sync.
For example, you may select only Monday, or only Monday through Friday.
Mandatory field. - Alert notifications
- Specify when to notify of the sync status:
- Failures (default)
- Success and Failures
- Never
Monthly sync
See the elements of the Monthly scheduling screen

- Repeat
- Select monthly.
Mandatory field. - Starts
- Accept the defaults, or set your own starting date and time for syncing.
Note that the timezone is in UTC+00:00.
Mandatory fields. - Day of the Month
- Select the days of the month when you want to sync.
Mandatory field.
There are two basic approaches:
- Cardinal day
- Click the Day selector, and choose by date of the month from drop down menu.
For example, select15to run sync on 15th of each month. - Ordinal day
- Click the The selector. Then choose one of First(default), Second, Third, Fourth, or Last. Then choose one of the days of the week, Sunday through Saturday.
- Alert notifications
- Specify when to notify of the sync status:
- Failures (default)
- Success and Failures
- Never
Does not repeat
See the elements of the One-time scheduling screen (does not repeat)
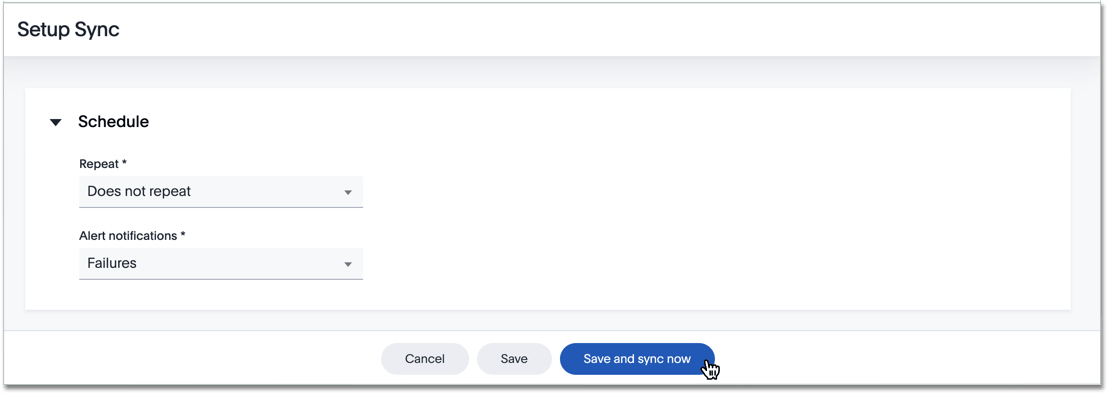
- Repeat
- Select Does not repeat.
Mandatory field. - Alert notifications
- Specify when to notify of the sync status:
- Failures (default)
- Success and Failures
- Never
Map tables
To map the external tables to ThoughtSpot’s internal database, follow these steps:
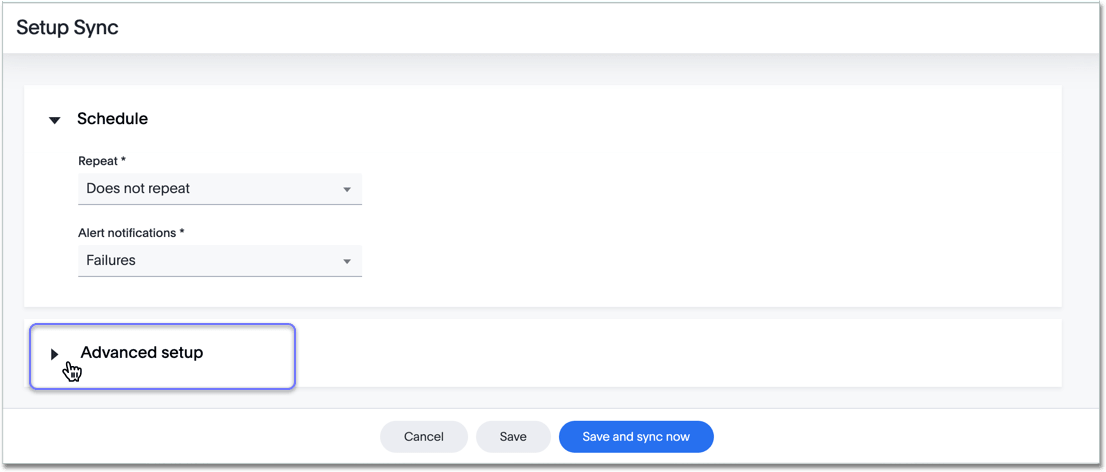
-
Open the Advanced setup interface by clicking the toggle to open.
See how to open Advanced setup
-
Choose the Map tables and columns tab.
-
Notice that the external database and table already appear, under External data source.
-
Specify the following information for internal ThoughtSpot storage:
See the elements of the table-naming screen
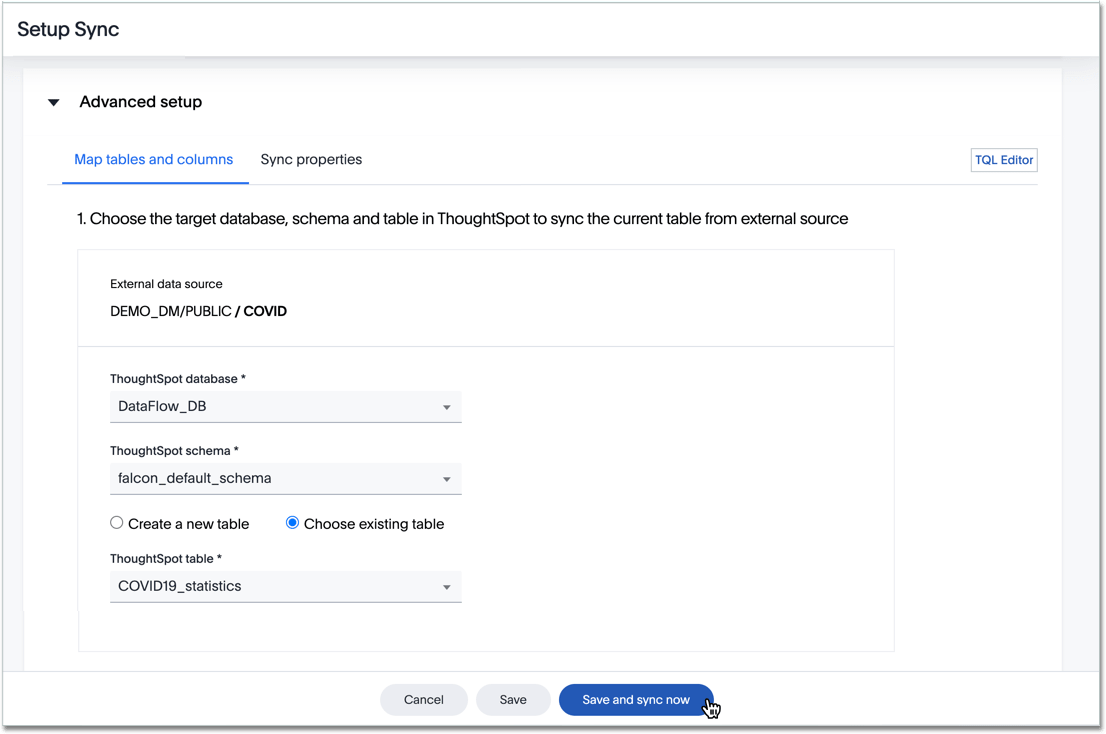
- ThoughtSpot database
- Select an existing ThoughtSpot database from the drop-down menu.
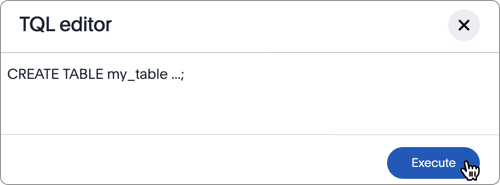
- If you wish to create a new database in ThoughtSpot, click TQL Editor, enter the
CREATE DATABASE my_database;command, and click Execute.
See how to create a new database in TQL editor

- Mandatory field.
- ThoughtSpot schema
- Select an existing ThoughtSpot schema from the drop-down menu.
- If you wish to create a new schema in your ThoughtSpot database, click TQL Editor, enter the
CREATE SCHEMA my_schema;command, and click Execute.
See how to create a new schema in TQL editor

- Mandatory field.
- New or Existing table
- Mandatory field.
- Create a new table
- Choose this option when you want to load data into a new table.
Click TQL Editor, enter theCREATE TABLE my_table ...;command, and click Execute.
See how to create a new table in TQL editor
Specify the table name. - Choose existing table
- Choose this option to load data into a table that already exists inside ThoughtSpot.
Select the table name from the drop-down menu.
- ThoughtSpot table
- The name of the target table for data sync, inside ThoughtSpot.
Mandatory field.
Map columns
To map the columns of the external tables to columns in ThoughtSpot’s internal tables, follow these steps:
- Open the Advanced setup interface by clicking the toggle to open.
See how to open Advanced setup
-
Choose the Map tables and columns tab.
-
Scroll down, to Map the columns… section.
-
Specify the following information for columns:
See the elements of the column-naming screen
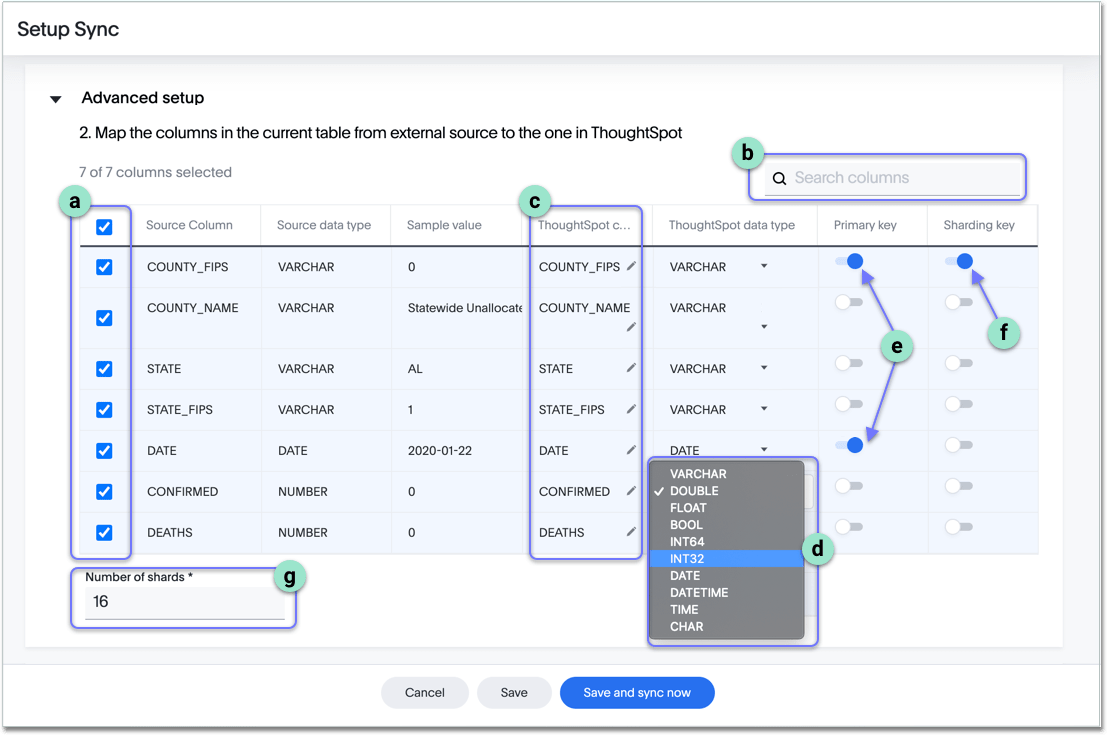
- Select (or deselect) columns for syncing into ThoughtSpot.
By default, all columns are selected. - Search for columns by name; this is very useful for very wide tables.
- Rename columns in the ThoughtSpot table, for easier search.
To make this change, click the pencil (edit) icon next to the name of the column. - Change the data type of the column inside the ThoughtSpot table.
Click the down chevron icon to open the drop-down menu, and select a new data type.
For example, if you know you have integer data, change the default DOUBLE datatype to INT32. - Set Primary keys of the table by toggling the selector to the ‘on’ position.
Note that several columns may be primary keys. - Set the Sharding keys of the table by toggling the selector to the ‘on’ position.
Note that sharding key columns must be primary key columns. - Specify the Number of shards in the table.
- Select (or deselect) columns for syncing into ThoughtSpot.
- Save your work by clicking Save.
Alternatively, click Save and sync now to save your work and sync data at the same time.
Set sync properties
Basic sync properties
To set the sync properties, follow these steps:
-
Open the Advanced setup interface by clicking the toggle to open.
See how to open Advanced setup
-
Choose the Sync properties tab.
-
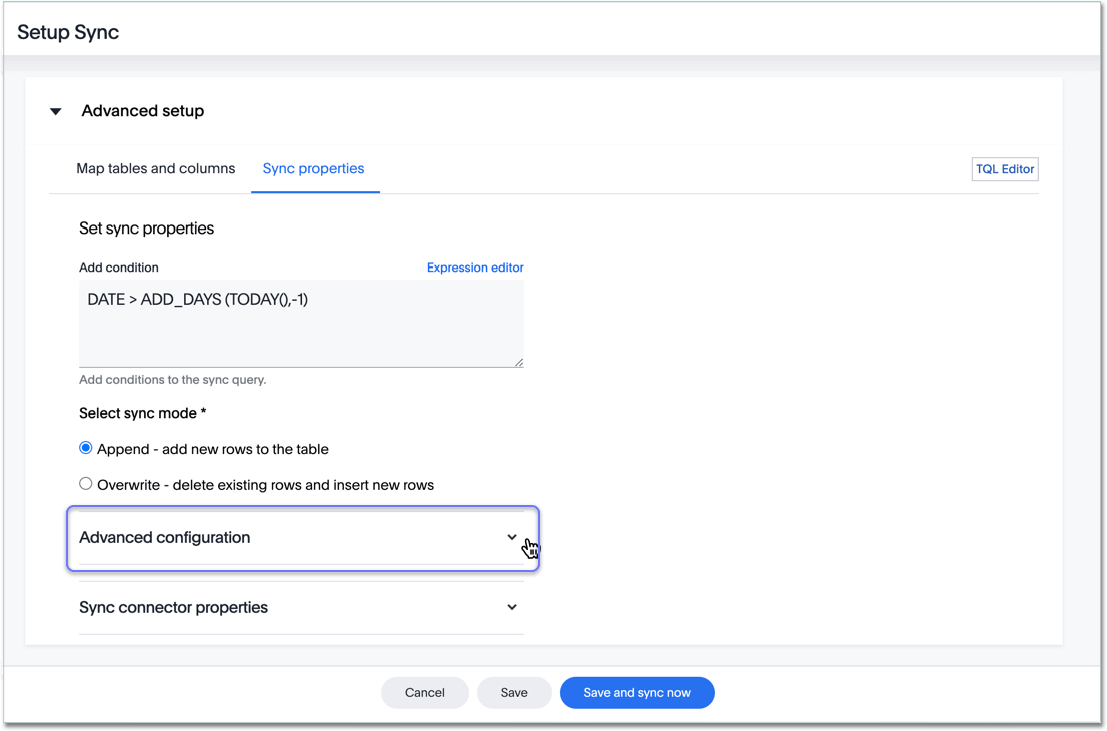
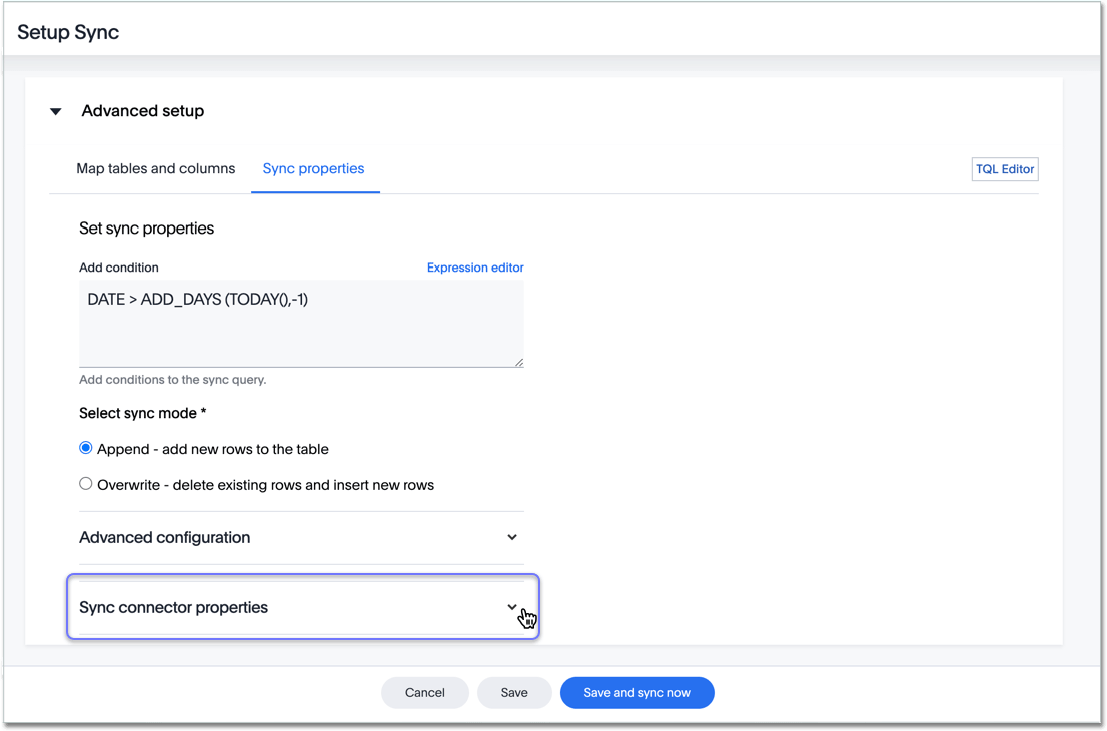
Under Set sync properties, specify the following information:
See how to set common Sync properties
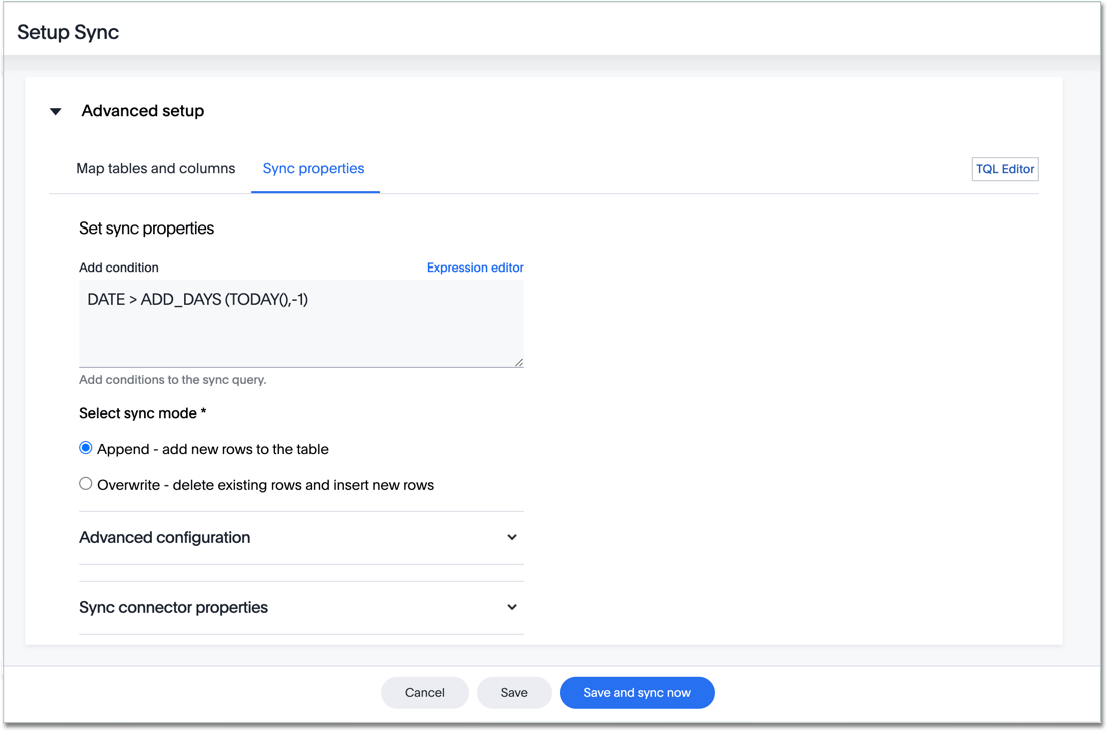
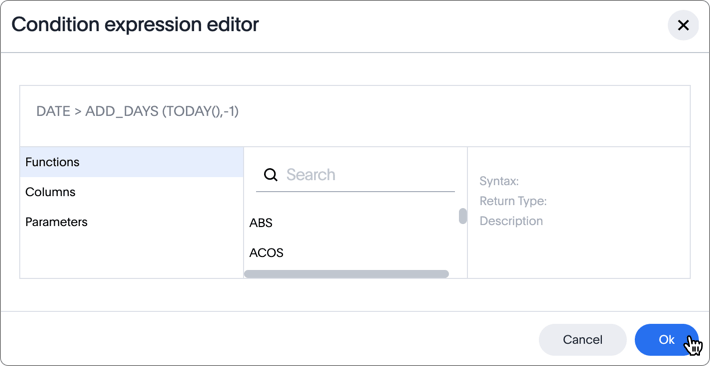
- Condition
- Add the condition that restricts the import of new rows into the ThoughtSpot table.
Optional field.
For example, to import rows of data from yesterday, enter the expressionDATE > ADD_DAYS (TODAY(),-1).
To find the correct functions for the condition, click Expression editor, use it to create a valid expression, and click OK.
See how to use the Condition expression editor to add sync conditions
- Sync mode
- Choose the sync mode, either Append or Overwrite.
Mandatory field.- Append
- This option adds new rows to the table.
- Overwrite
- This option removes all existing rows, and then adds new rows to the table.
-
Save your work by clicking Save.
Alternatively, click Save and sync now to save your work and sync data at the same time.
Scripting for sync
To use scripting before or after the sync, follow these steps:
-
Open the Advanced setup interface by clicking the toggle to open.
See how to set common Sync properties

-
Choose the Sync properties tab.
-
Scroll down to Advanced configuration, and click the toggle to expand.
See how to expand the interface to see Advanced scripting options
-
Specify the following information:
See how to add sync scripts
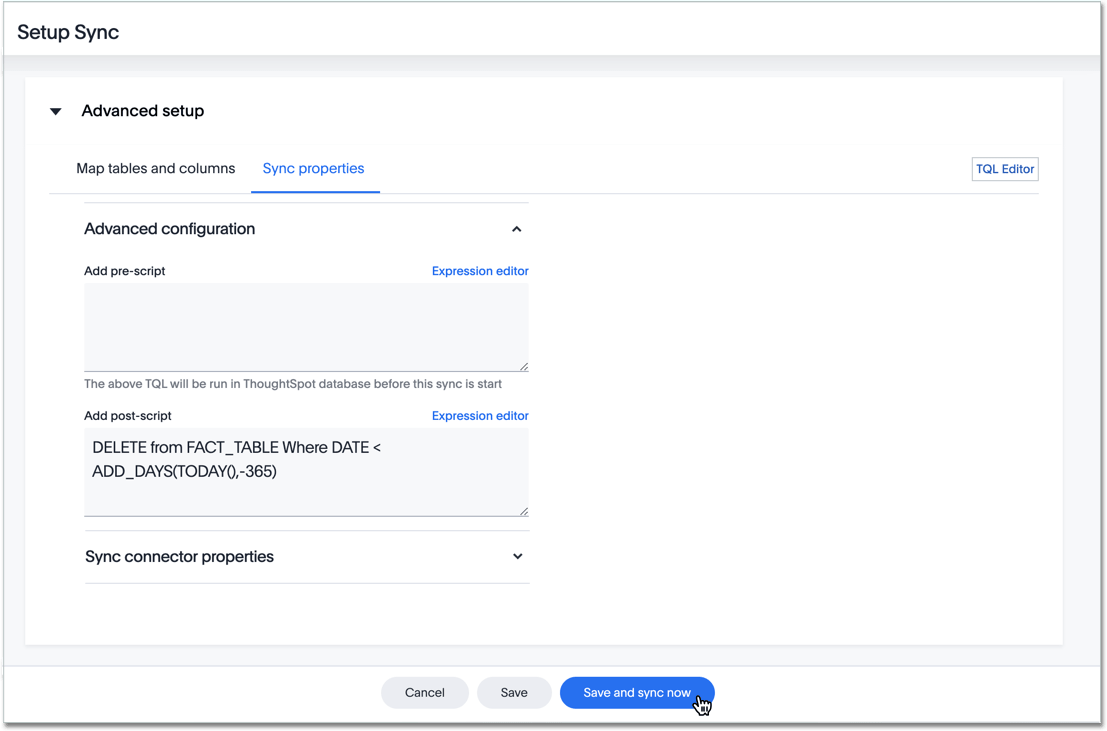
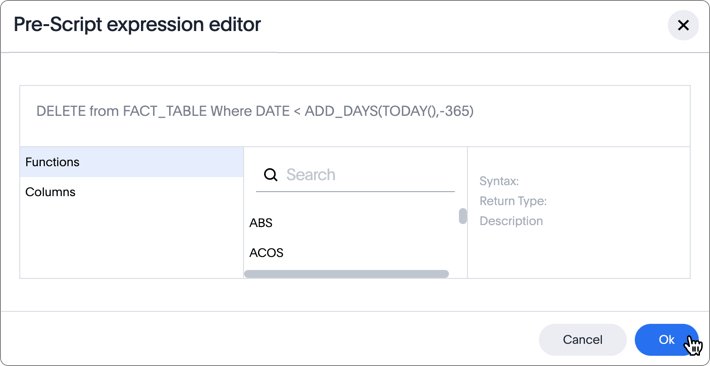
- Pre-script
- Add the script that you want to run before syncing.
Optional field.
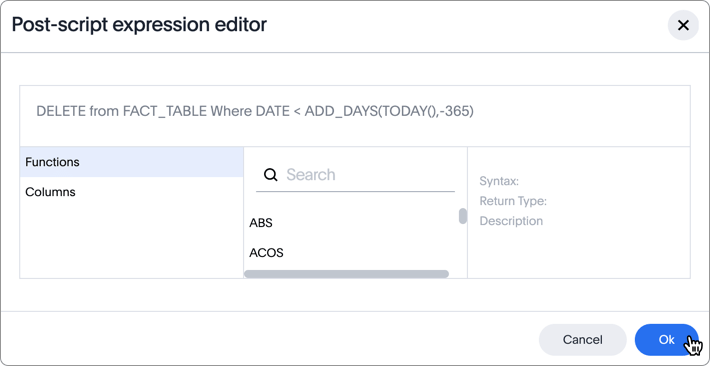
For example, to drop data that is over 1 year old, enter the following expression:DELETE from FACT_TABLE Where DATE < ADD_DAYS(TODAY(),-365).
To find the correct functions for the script, click Expression editor, use it to create a valid command (or several commands), and click OK.See how to add a sync script that runs before the syncing begins
- Post-script
- Add the script that you want to run after syncing.
Optional field.
For example, to drop data that is over 1 year old, enter the following expression:DELETE from FACT_TABLE Where DATE < ADD_DAYS(TODAY(),-365).
To find the correct functions for the script, click Expression editor, use it to create a valid command (or several commands), and click OK.
See how to add a sync script that runs after the syncing finishes successfully
-
Save your work by clicking Save.
Alternatively, click Save and sync now to save your work and sync data at the same time.
Connector-specific sync properties
To modify connection-specific properties for sync, follow these steps:
-
Open the Advanced setup interface by clicking the toggle to open.
See how to open Advanced setup
-
Choose the Sync properties tab.
-
Scroll down to Sync connector properties, and click the toggle to expand.
See how to expand to see connector-specific sync properties Advanced setup
-
Specify the sync properties for IBM Db2:
See the Connection-specific sync properties screen
- Data extraction mode
Specify the extraction type. - Column delimiter
Specify the column delimiter character. - Null value
Specifies the string literal that should indicate the null value in the extracted data. During the data load the column value matching this string will be loaded as null in the target. - Enclosing character
Specify if the text columns in the source data needs to be enclosed in quotes. - Escape character
Specify this if the text qualifier is mentioned. This should be the character which escapes the text qualifier character in the source data. - Fetch size
Specify the number of rows to be fetched at a time and processed in memory. If the value specified is zero then, all rows are extracted at once. - TS load options
Specify the parameters passed with thetsloadcommand, in addition to the commands already included by the application.
See Sync properties for details, defaults, and examples.
- Data extraction mode
-
Save your work by clicking Save.
Alternatively, click Save and sync now to save your work and sync data at the same time.